 Audacity is a piece of powerful sound editing software that is free to download. It is available both for both Mac and Windows computers.
This tutorial will discuss the uses of Audacity software in the piano studio, and explain how to use Audacity to make basic edits to audio files.
NOTE: The correct site for finding and downloading the free Audacity software is audacity.soundforge.net, NOT audacity.com as one may expect.
Uses for Audacity for Piano Teachers
- Recording students playing their pieces during the lesson for educational purposes; e.g., to prepare for an upcoming performance.
- Recording student recitals to share with parents on a cd or on your website.
- Making basic edits to your recordings before sharing them.
- Assigning students to record and edit themselves in Audacity — or even assign them to create their own composition using Audacity (see the Ideas for Further Extensions section at the end of this post).

How to use Audacity: Getting Started
- First, download and install the software onto your computer.
- If you have an external microphone you’d like to use to record, plug it into your computer now. If you do not own an external microphone, no worries: most computers nowadays have a small internal microphone which can record sounds. NOTE: Be sure to plug in your external microphone before starting up Audacity — otherwise Audacity will probably not recognize your microphone and as a result will record using the default internal microphone instead.
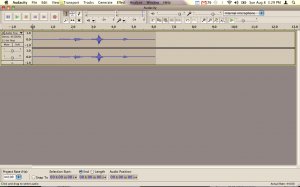
- Open the Audacity software. A window should open that looks similar to the screenshot on the right.
- To record sounds, press the red record button. You will see an “audio track” appear, and as you are recording a pair of blue lines will appear across the screen, its shape reflecting the sounds that are being recording. To stop recording, press the yellow stop button. You can also start and stop playback by simply pressing the spacebar.
- To listen to what you have recorded, press the green play button.
Using Audacity: Saving and Exporting Your Projects
- To save your Audacity project, select File > Save Project from the drop-down menu across the top of the screen. Audacity projects are saved as “.aup” files, which are files that only Audacity can open. You cannot listen to .aup files in iTunes, a cd player, an mp3 player, etc. Saving your project as an .aup file only allows you to return to the project later and continue editing it in Audacity. As you are working on your project, be sure to save your project regularly (at least every 2 minutes is recommended).
- If you are finished with your project and you wish to save it in a format that iTunes, a cd player, etc. would be able to play, select File > Export. Type in whatever you wish this file to be named, and select the format in which you wish to save this file. The .mp3 file format is a small, compressed file that is suitable for posting/playing online. The .wav and .aiff formats are cd quality file formats and are highly recommended for most uses.
Using Audacity: Making Edits
The are a number of ways you can edit audio files in Audacity in order to make your recordings sound much more professional. And the good news is — it is pretty easy!
Deleting applause or other unwanted segments:
Using your cursor, click and drag to highlight the segment of the audio file that you wish to remove from the track. You may wish to play your file a few times first to make sure that you have exactly the right selection selected. If you accidentally delete the wrong amount, you can undo by selecting Edit > Undo (or press Ctrl + Z) only if that was your most recent edit.
Fading in and fading out:
If you file begins or ends with some distracting sounds in the background, you may wish to have the file fade in or fade out so that the file does not begin or end too abruptly. Highlight the area of the file you wish to fade in or fade out. Then select Effect > Fade In or Effect > Fade Out from the drop-down menu across the top.
To add a few seconds of silence to the beginning or end the recording:
Select the area of the audio track that you wish to replace with silence. Select Generate > Silence from the drop-down menu. Click “Okay” when the dialogue box appears.
If you wish to insert silence instead of replacing an area of the audio track with silence, then you must move the audio track back a few seconds/beats. To do this, press the Time Shift Tool button in the toolbar along the top. It looks like a two-ended horizontal arrow. Now click and drag the audio file a few beats to the right. To exit out of the Time Shift Tool, you must select the Selection Tool button (which looks like a capital “I” and is located near the Time Shift Tool button).
To separate various areas of a long recording into separate tracks/files:
Highlight the entire area you wish to change into its own track. If the selection is finished being edited and is ready for export, you can simply select File > Export Selection. However, if you wish to edit the selection further before exporting, you can select Edit > Split New. This will put the area you highlighted into a separate audio track below the original. To delete the original audio track, click the small X in the top left hand corner of that audio track.
For Further Reading
There are a lot more different kinds of edits that can be done to your audio files using Audacity. If you need help figuring out how to do other kinds of edits in Audacity, consult the Help menu included with all Audacity installs (select Help in the drop-down menu across the top), or the “Help” section on the Audacity website. Please also feel free to comment below this post and I will do my best to answer any questions you might have.
Ideas for Further Extensions in the Piano Studio
- Record students using your computer and Audacity during the lesson, export the file as a .wav or .aiff file, and email it to the students to listen to at home on their computer or mp3 player. Listening activities such as this can be used to promote critical listening for an upcoming performance, and/or to allow students to share their music with their friends via their mp3 player or facebook. Kids/teens love technology, and it’s great when piano can be a part of their social life in some way!
- If there is limited time during the lesson and students are older and technologically saavy (as most are nowadays!), assign them to record themselves playing at home using a computer with Audacity and then listen to it. Be sure to show them how to export their recording as a .wav or .aiff file so they can share it if desired.
- Older students can also be assigned to learn how to do some of the basic editing described above. They could either be given a pre-recorded file to edit, or be instructed to record themselves playing first. This would also make for a great activity during a group lesson.
- Assign students to compose their own piece using Audacity and free audio clips from sites such as freesound.org (Audio files from this site are free for download and use in a project such as this as long as credit is given to the site for the used files. Before you can download, you must first create a free account on their site.). This project would work well either for a single student who is interested in composition, or for a group of students to work on together with supervision during a group lesson. I plan to post my own example of such a composition project soon.
Good luck with your projects, and be sure to let us know how you are using Audacity in your studio!


I like to record students before they take an exam. I play back their songs for them, and ask them what they’d like to do differently before their exam. It’s great to just record a whole lesson one week, and then edit it to the particular song you want to concentrate on. Then it doesn’t disrupt your lesson to start and stop the recording. I’ve also recorded recitals, and “cut out” excerpts to give to students.
Thanks for your comment, Sara! These are all great ways to use Audacity.
This was very well written and easy to understand. I have been fumbling around with audacity and use it for all my recordings in the studio but didn’t know about making tracks or adding silence to the beginning. Thank you!
I’m so glad you found this tutorial helpful, Cindy! Thanks for leaving the comment!
Hello. Thanks for your tutorial. It’s been helpful so far. However, I just downloaded Audacity last night; so I do have a few quuestions. I have a Shure Mic that I want to plug into Audacity. Can I purchase a USB adapter for a Mic? Also, how do I plug in my Yamaha piano and then get Audacity to recognize it? Finally, I assume I am able to record my piano on one track and then do the vocals on a different track, while I listen to the first piano track. Correct?
I look forward to earing from you.
John
Hi John,
I’m sorry I can’t help more but if you have questions about Audacity, I would recommend contacting them directly. The only question I can answer of yours is that yes, you can record piano on one track and then do vocals on a different track while listening to the first track. I think there’s an option in a dropdown menu for adding a new track, which will allow you to do this. I don’t use Audacity all that often, so I’m sorry I can’t be of more help. I can tell you that if you have a Mac, you can also try using the program GarageBand (it comes preinstalled on every Mac) you can do these things there too. It might be a more user-friendly option than Audacity.
Good luck!