

This has got to be one of the most-used DIY projects I’ve ever made!
Music whiteboards cost a pretty penny in music catalogues, so I decided to make my own. I bought this 8.5×11” frame from IKEA for under $3. I chose one that had plexiglass instead of glass, so that I won’t have to worry about it breaking if it gets dropped. The frame is a sturdy plastic.
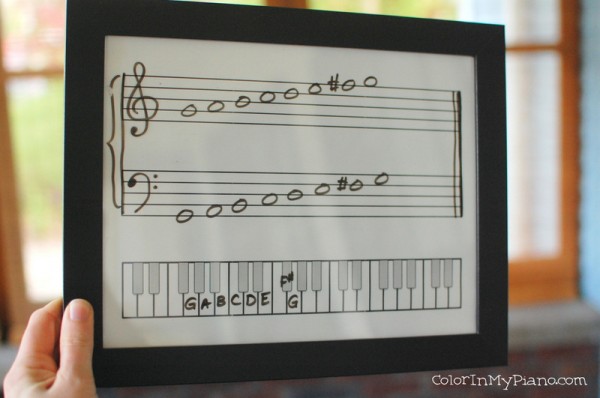
On my computer, I designed the staff and keyboard pictures on a horizontal piece of paper, printed it, and inserted it into the frame. Easy!
I can’t tell you how often I’ve been using my DIY music whiteboard! I pull it out during lessons all the time. With beginners, I like to be able to quickly review the notes they’ve learned so far before I introduce the next. Sometimes I have the student draw the notes, or and sometimes I draw the notes and ask them to identify them. Either way, you can also have the student draw lines from the notes to the corresponding piano key below. I like practicing intervals on the whiteboard with students, too. With older students, you can quickly and easily draw out scales or chords.
If you make two or more of these whiteboards, you could probably come up with some fun games to use during group classes. I’m imagining music trivia with two teams (quizzing intervals, major/minor 5-finger patterns, scales, key signatures, etc.) or maybe some melodic dictation!
It seems that whiteboards are often hard to erase. I’ve learned a few tricks though:
- Never use red dry erase markers.
- Always erase the board when finished. The marker is always harder to erase after it has sat there for a few hours.
- You can try cleaning it off with water (or hairspray or any other cleaner Google suggests), but after awhile, the whiteboard will still get yucky and hard to clean.
- Fortunately, I found out that replacement plexiglass sheets can easily be bought at craft stores! I found 8.5×11 sheets for under $2 at my local Hobby Lobby store.
I just added the “Whiteboard Background” pdf to the Printables > Other Resources page, if you’d like to download it (scroll down to the W’s). It might be fun to design a few other types of backgrounds for the whiteboard. Let me know if you have any suggestions! 🙂
 Whiteboard Background - for 8.5x11'' Plexiglass Frame (20.7 KiB, 9,879 hits)
UPDATE: This is the frame I bought from Ikea.
this is great! I always see suggestions for activities with a music whiteboard, and I don’t have anything to substitute. This would save a great deal of paper as well! Do you know if I could find an 8 1/2″ by 11″ frame with plexiglass anywhere besides Ikea?
I know that dollar stores always have them with glass, and they might have one with plexiglass, too. If they don’t, you could always buy the glass one and then put in a plexiglass sheet from the craft store.
Or, maybe you could find a plexiglass frame that is 8×10 instead of 8.5×11. You’ll just have to trim the background to fit (you can let me know if it looks bad, and I can easily make another background that will perfectly fit 8×10). 🙂
Great idea! I’ve use a picture frame as a small dry erase board, but hadn’t thought about adding the staff and keyboard behind it. I will definitely be making one of these to use in my studio, and maybe multiples to use in group class. My kids always love a chance to write on a white board!
LOVE this idea! In the past, I laminated staff paper for write and wipe, but this is so much more versatile and easier to make! Another option that is less bulky and without a frame is “DocU-Pockets.” They are sleeves you can easily slip 8 x 10 copy paper into. I use them around the studio for signs, but they firm enough to use as write and wipe boards. You can find them at trainerswearhouse.com. Small squares of fleece fabric make wonderful erasers for our classroom.
Thanks for sharing your many wonderful ideas Joy!!!
I love the idea of using fleece fabric as erasers, that would definitely make the plexiglass last longer! I will have to check out the “DocUpockets”, they sound like they would be a great portable substitute for the whiteboard. I also love the idea of slipping theory sheets in and out so that they can be re-used again and again!
Great idea, Joy! It’s nice to have this option for all students rather than just one because of the cost! Just a side note…the magic eraser works great to clean them – even when using red markers!
I think the ideas presented are great. It will require research on my part. If any one knows of an electrified staff on white board with lights that could be connected to an electric piano I would be very happy. I have serious difficulty sight reading as I memorize pieces and technical work too easily so if I put and electric staff on the wall in front of me then sight read from there I might get out of very bad habits like looking at the keys instead of the music.
Hi Joy! Great idea! I have one similar to your graphic, but paid about $30 for just the one. This is a great option to have more than one in the studio! And a great way to vary the graphic! Thanks for sharing! Just as a side note…a magic eraser works fabulously on whiteboards and will even easily remove the red marker!
Rubbing alcohol works great too!! Great idea. Can’t wait to try it out!
Brilliant!
I used wet-erase markers — it’s a slight nuisance to wipe them off, but they come off really cleanly.
Magic Erasers (in the cleaning section of the store) make great erasers for the stubborn dry erase markers I sometimes forget to wipe off of my sheet protector binder activities. They might work well with this too. I usually cut them into smaller pieces.
Thanks for the tip!
Awesome! Great minds think alike – I recently did this same thing, but just laminated the page. (I have a home laminator so it didn’t cost me anything!) I like the idea of the frame though! Very cool.
Hi Jenny! I’ve laminated sheets, too — definitely a great idea — but the sturdiness of a DIY frame whiteboard in pretty handy to use by the piano when teaching!
Great idea and design! I just spent many hours shopping for a whiteboard with music staff lines. So glad I found your blog!! The space between those lines is perfect to work on!! I printed your sheet out and laminated it with a regular 3 mil film, it is a little thin. Then I tried doubling the films, made it into 6 mil. It works better. I am now going to order the 10 mil film and hopefully it will be thick enough to work like a lap top. I might also try the frame you suggested. Thanks a lot!
I am so excited about this idea!!!!!! Thanks so much, Joy! I bought one at NCKP last year that I’ve used alot. It also has magnet note heads….but quite expensive and this alternative will allow me to have several for group lessons. You’re amazing!
Love it, this works perfect especially when you’re on the field and trying to give clearer instruction on the fly! subscribed 🙂
This is a genius idea! I got frames from the dollar store and don’t mind using the glass, as it is easier to clean. My only request – could you shift the keyboard so it has C in the middle and aligns with the grand staff? Looking at it, it is hard to define which one is middle C. Thanks so much for this idea!
What a great idea! I can’t wait to make one and I know my students will love it!
Just discovered an even easier idea for anyone who has purchased (or is contemplating the purchase of) the Maestro’s Mate Music Holder that we sell on our website (#TG3 or TG4): I printed out the whiteboard background PDF that Joy has created and shared here, and slid it into one of the semi-rigid clear plastic panels of the music holder. It works beautifully with dry erase markers. You could also create other exercises to slip into the transparent panels when not using them to support music. It’s unbreakable, light weight, doesn’t retain the ink stain from the markers, and supports itself without a frame. Thanks, Joy, for the PDF. It’s perfect!
Love it, I came across your blog when I tried to work out how on earth to draw straight lines onto a piece of glass – google didn’t seem to have the answer. My idea is like yours, just larger – I had a coffee table, got a piece of glass cut to go on top, and I wanted to get ten stave lines to on on the back of the piece of glass, so that it would double as a musical whiteboard.
You can see the end result here:
https://www.facebook.com/photo.php?fbid=218778951647511&set=a.218778961647510.1073741831.165671776958229&type=1&theater
In addition to a musical coffee table, I have made myself a mini-musical whiteboard just like yours. Thanks for sharing your awesome idea! I brought two frames and I play musical battleships with my students – It’s a great exercise for telling the difference between lines and spaces.
This is a GREAT idea! Would children’s washable markers work instead of the dry erase? They have the non toxic with scents that the children would also enjoy.
Brilliant idea girl! Bless you.
Dry erase markers will erase themselves. If the dry erase is hard to remove with an eraser, old sock, or felt scrap, just mark over it again with a fresh dry erase marker and wipe. Viola! 🙂 Blessings to you!
I have wanted a piano whiteboard for so long, but I couldn’t justify spending the money on it. Now I can make my own whiteboard, and it only cost $5! Thank you so much for the tutorial, and for the printable page. This will make teaching my kids the piano so much easier.
Thanks so much for this. I have a couple of stave whiteboards but I love the addition of the keyboard below. Will definitely print and laminate.
One thought would be whether you could possibly create a second version where the keyboard was rotated to vertical and aligned to the staves so the keys correspond to the appropriate lines and spaces. I guess you would have to stretch the middle C keyboard note to retain the staves’ spacing but it could help some pupils make the connection between pitch and notation. I know you would change the proportions on the page and end up with relatively less stave space, but maybe worth a try. A thought anyway!
Thanks again. I am going to enjoy returning to explore your blog and website. Just came across it having watched your interview with Tim Topham. Brilliant all round! 🙂
I’m pretty crafty myself, so I thought I would share a few bits of insight.
I totally agree with you keeping breakable glass out of the lesson room. You can buy bulk plexiglass at hardware stores (around me it’s either Ace, Menards, Home Depot or Lowes). The plexiglass can be cut to size on a table saw pretty easily. This would open up all sorts of options for frames. The Ace Hardware in my town actually does custom framing and could build something to any specifications.
Another tip that I have is using blank overhead projector transparencies over the plexiglass. This would work sort of like a screen protector on an iPhone. So if you did forget to erase or it started to look dingy, you could replace with a new sheet. Using a paper cropper to cut the transparencies to size would be ideal.
Another cheap idea would be to use a clipboard with a print out and then put the transparency over that and bypass the frame all together. You wouldn’t have to cut or fit anything. Of course this option would be subject to twisting and turning a bit, but I don’t think it would be that bad. I use a lot of clipboards in my lesson room (I teach guitar).
Thanks for the great inspiration.