

I got the idea for this craft from Kara’s Creative Place blog (thanks for the brilliant idea, Kara!). Ribbon Rings (Kara’s example is pictured at right) are a fun prop for movement activities with young students during group lessons, camps, or early childhood music classes. Kids love fluttering the ribbons of these props while they do the motions to various songs. You can buy similar ribbon rings at musicmotion.com…..or you can make your own!
These ribbon rings are made using the (non-sticky) plastic tape that is found at most hardware stores near the Caution tape. I did consider using satin ribbon, however, plastic tape is much, much cheaper. And actually I was pleasantly surprised at the results of using plastic tape. I like it much better. Because it’s so light, it flutters in the air so much better than satin ribbon would. Definitely give it a try before you invest in satin ribbon!

I made a set of eight ribbon rings of a medium length (18”). I may also make a longer set for older kids and a shorter set for toddlers in the future (in which case I will definitely use plastic shower rings instead of metal craft rings). I also found a closet organizer (meant to hold belts or ties, I think) to hold my ribbon rings and store them safely in my closet.
Here’s how I made mine:
Materials:
- Round, plastic shower curtain rings -OR- 2”-3” metal craft rings (generally cost about 50 cents each at craft stores).
- Plastic ribbon tape (located near the Caution tape in most hardware stores; costs around $3 each). One roll makes a lot, so buy only one roll unless you want more than one color.
- yardstick/ruler
- scissors

Instructions:
- Using the yardstick and scissors, cut the plastic tape into strips. You can make the ribbons any length depending upon the age group you plan to use them with. (Suggestion: Try roughly 12” for toddlers, 18-36” for ages 6-8, and 36+” for ages 12+. Cut the strips twice the desired length. Once knotted, three long strands will become six strands of desired length.
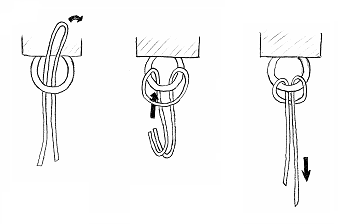
- Knot the strands to each ring. A simple loose knot (like the first half of tying your shoe) works just fine, or you can do a cow hitch anchor knot (see right).
 Repeat with the rest of your rings. Make as many as you need!

 There are plenty of activities you can do with ribbon rings. A few quick ideas:
- Students can move freely around the room with their ribbon rings to interpret and reflect different styles of classical music. Even older students and adults enjoy using ribbons for interpretive movement. Sometimes they might just need a little coaxing and encouragement! The use of props can actually help prevent students from becoming self-conscious during movement activities. It gives them something fun to focus on beside themselves.
- Young piano students and early childhood music toddlers can wave the ribbons as they sing and do the motions to children’s songs. Up/down and high/low sounds are both concepts can be taught using ribbon rings.
Download the pdf instructions with illustrations here.
I was looking for just this thing for the musical “Sleeping Beauty.” The fairies are going to wave the ribbons while they sing. I think it will be beautiful. Thanks for the great details in how to make the ribbons.
Glad to be of help. =) I hope your production goes well.
Just popped over to see why I was getting so many hits from your page. Now I know. I am glad you liked the project. I make these all the time these days for my band’s shows. Kids dance and sing so much more when they are holding them. (I also write and perform children’s music) My degree is Vocal Music Ed so when another teacher mentioned how to make these around 5 years ago I never forgot.
@Kara: Your ribbon rings are amazing! I was so thrilled to happen upon your blog and find this easy and fun project, that I just had to share it here. =D
Thanks for stopping by! I took the liberty of listening to some your band’s music, and I really enjoyed it!
I’m so glad I found your DIY on these rings! I would never have thought to use flagging tape from the hardware store. These will be perfect for my Kindergarteners to get some movement in their day since we don’t have PE. I was lucky enough to get some acrylic rings donated to me so I could make these on the cheap.